![]()
There are tons of tutorials out there that show how to use Git, starting with easy things like cloning a repository and committing locally, then pushing your commit to the server. There are lots of sites and videos that will help you achieve a competent level of Git expertise – like this one. However, you may struggle with the interface and if you have problems, you may struggle to understand why and how to fix them. That is why I am going to explain Git this way: inside out, backwards and hard. This three part series is targeted for people who want to excel at using Git and deeply understand it. This is also intended for people who are willing to persevere a bit more than the average person. Lastly, this is for people who like to see the beauty in things and, trust me, Git is beautiful.
Removing Old Paint
To begin with, we need to start by stripping away everything that is not necessary to understand the core of Git. There are a few things that are not critical for tracking changes in source code. It doesn’t matter where the code lives; for example, on your computer or on a server. It doesn’t matter who is making commits on the code. It could be you, the group expert, the project owner, the new employee, the CEO of the company who doesn’t know anything about coding, or a competitor. For the core of Git, these issues are not relevant.
We also need to strip away some concepts that you may have acquired from using other revision control systems like Subversion. While Subversion lets you follow the code from one commit, to the next, until the last commit, a Git repository doesn’t tell just one story. Branches and Tags are not necessary for where we are going. Also, we are tossing out version numbers and we are not giving them back. Now, I am not saying that Git does not use these ideas, but I believe it is easier to build them back up after we have some basic understanding of the Git Graph.
The Graph
Each Git repository has a graph of commits. It’s a graph, not a tree, or a line (Subversion). You can see an example of one below.
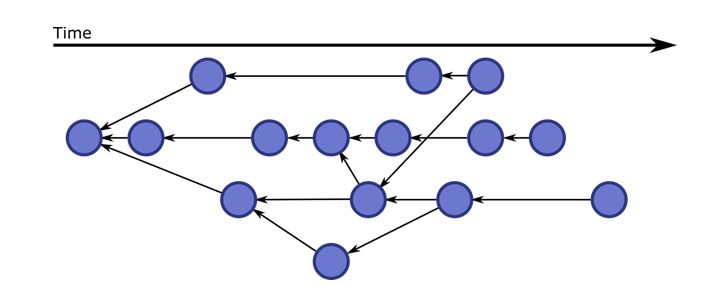
Each blue dot is a commit. Each commit has one or two parents, denoted by the black arrows. Each commit also contains the changes made to the parent, or the parents, as well as some metadata like a comment, author name, and maybe a digital signature to assure the identity of the author. All of this data about the commit, including the parent(s) and the changes, is then hashed. This hash uniquely identifies each commit and replaces the idea of version numbers. A hash looks like this: “ec0dd1aabcadb7aa321f851de045e6b1fa31fa73.” However, it can be shortened down to the first 7 characters: “ec0dd1a.”
At this level, there is no concept of branches, tags, or what commit is currently the best to use. There is support for authors, but only in the form of data. Nothing like permissions are implemented at this level. While there is an idea of project structure here, it does not exist on the file system. Project structure only exists inside the Git repository’s database.
As you can see, at this level, there are many commits that could be considered the latest working copy, but they could also be abandoned ideas. You can also see the nodes that have two parents, which are merge commits. This structure makes merging very easy because it is clear what changes are new and what changes don’t need to be considered (more on that later). You can also see nodes that have many children. These are where new ideas are tested, or new features are developed. As you can see, you can have a new idea or feature whenever you like, so you can start where it is most convenient for you.
In the image below, you will see a deeper dive into why Git merging is more automatic. You can see on the left an example of Subversion branching and merging, while, on the right, you can see Git branching and merging. Notice that since Git keeps track of the history of all changes, it knows exactly what is important for the merge. Subversion has no idea if something is new or old and it needs a developer to manually indicate what differences it should take or leave.
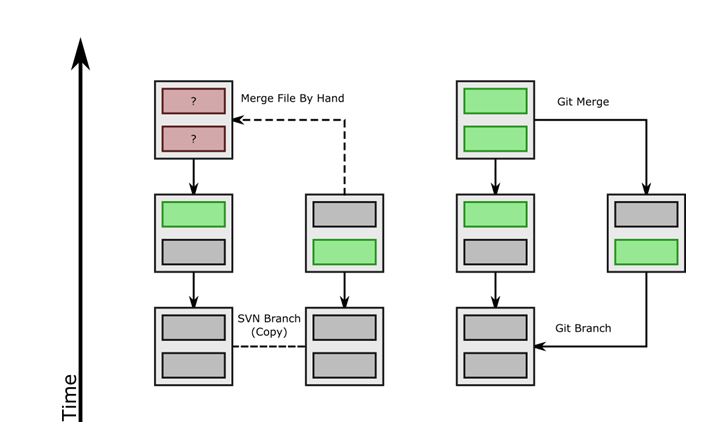
Recently, Subversion has added some metadata to indicate history, but in my experience the merges still leave a lot to be desired compared to Git.
This is the conclusion of Part 1. If you have any questions, feel free to reach out via the comments section. Stay tuned for Part 2, where I will talk about Git Branches.