![]()
Previously, in Part 2, we went over Git Branches and the HEAD. Let’s continue by starting off with Remotes and how to get your stuff to other developers or into a project.
The Remotes
Great, so does every developer need to work on the same computer that has the Git repository? That’s a good question. Let’s talk about Git Remotes. A Remote is a URL to a repository in a different location. The Remote repository could be in a different spot on your computer or it could be across the internet in India. If you cloned your repository from Github, or Gitlab, or from some other location, your repository will have that source repository setup as a remote called “origin”. Again, with Git, nothing is special and neither is “origin”. Your repository can have many remotes and you can add them and remove them as you desire.
If you clone a repository, you will, by default, get all the commits that the repository had, – you will get the “master” branch, and the HEAD will be pointing at the “master” branch. At this point, you can make all the commits you want since you will be making the commits in your new local repository, you won’t need to have a connection to the Remote repository. I have created an image of it below.
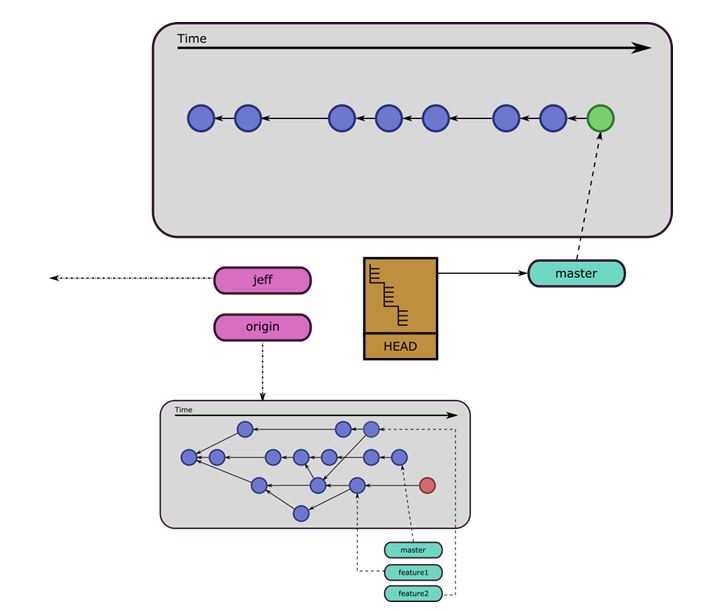
The purple items are Remotes. The “jeff” Remote points to something else not visible, maybe Jeff is your co-worker with whom you swap a lot of code with. The other Remote “origin” is depicted in more detail. You can see that you only grab the commits that you currently have branches for. Notice that the “origin” Remote does not have a HEAD. This is pretty common for repositories that act as just a storage location and not a location for work to be done. You can see that there is a new commit in the local repository in green. You can also see that the master branch has been moved forward automatically by the commit.
Getting your changes to a Remote
So you have made some commits locally, but no one knows or cares about your repository, they only know about the “origin” repository. The “origin” repository is where the production code lives. That is where you need to get your new commits in order to complete your task.
The Push
You can run the command “git push origin master” or if you have the “master” branch set as an upstream branch set you can just do “git push”. This copies your commit up to the “origin” Remote. There are a couple of things that can go wrong though:
- The remote branch “master” has new commits on it that you do not have. You will need to do a “git pull origin master” or “git pull” to grab the new changes. This will start a merge automatically. Unless you have either waited a long time to push or changed a lot of things, this merge should resolve automatically.
- The remote is read only. This is pretty likely as most people don’t want to automatically take code from anyone without reviewing it. Do you want people just putting their un-reviewed and un-tested code in your repository? See The Pull Request, below.
The Pull Request
Someone owns the “origin” repository. Find them. Send them an email with a URL to your repository, or some other form of communication. Ask them to pull in your new changes. They will set up your URL as a remote and attempt to merge in your changes. If they see something they don’t like, they can abort the merge and let you know. Here are some issues you can expect to see:
- Your new commits don’t build. You will need to fix your code and re-submit your request.
- Your new commits don’t pass tests. You will need to fix your code and re-submit your request.
- Your new commits didn’t pass review. Please make these changes and re-submit your request.
- Your new commit is based on a really old commit, you need to pull in the new commits and merge them into your own. You will have to re-submit your request.
Yeah, they could fix the stuff too, but it would be much easier for you to fix it. These days you will be cloning from some Git service repository like Github or Gitlab. These services may provide a pull request system that includes reviews and automated test and build systems to make the pull request less transactional.
The Rest
So I am going to rush though some other concepts really quickly because they are not really deeply intertwined with the core of Git, but are things you should be aware of:
- Git Tags are like Git Branches, except they never move on their own like branches. They are a useful tool for denoting a release. If you checkout a Tag, your HEAD will be in “Headless Mode”. A tag can be made on any commit at any time.
- The Git stage is a place to put content (not files) into. All commits pull their changes from the stage and not files that are different from the last commit. Before you commit your work you must do a “git add” to add all changed content to the stage. Then you can commit. You can also add only certain content to the stage by doing something like “git add file1.txt file2.txt”. All content that is different than the current commit in the specified files are added to the stage.
- A Git Submodule is a way to embed one Git repository into another. This is done by specifying a remote URL and a hash to load the submodule with. If you run into these, it is a really good idea to familiarize yourself with the “git submodule” command. For the most part, submodules are a way to pull libraries that you need into your current Git project without just copying and pasting in the files. The Submodule is just like a normal Git Repository. Developing a tree of Git Submodules is not a normal use case. Because of this, there is little support for it. I have written a tool that can help out called “git-imp”.
- Rebasing a commit, or set of commits, is simply moving the current commit’s parent to a different parent. This can help flatten the Git graph, but you lose some information about the history of the changes. You can also use the rebase command to “flatten” your set of commits. While this keeps your history clean, any branches that were created during the history of the “flatten” commit have now lost their relationship with the new “flatten” commit. This will create huge merging problems. Use with caution.
The Conclusion
I think this is a good place to stop. I know I didn’t cover hardly any of the commands, but you can find those all over the internet. You should be ready to dive into Git now without any hiccups. I should warn you though, while the theory behind Git is beautiful, the command line interface is really not. Also check out the “gitk” program. It shows the Git graph of your project and can help diagnose some problems.